Embroidery is a fun and creative way to bring designs to life. You can turn a simple image into a stitched piece of art. But before your machine starts stitching, there is one key step. You must prepare your file the right way.Many beginners feel confused at this stage. They ask questions like what format should I use or how do I make my design stitch-ready. If you are also wondering How do I Convert a File to Embroidery?, you are not alone. This guide will walk you through everything in a simple and clear way.
Why File Preparation Matters
File prep is the base of good embroidery. If your file is not ready, your design may not stitch well.
Common Problems from Poor Files
- Broken stitches
- Uneven lines
- Wrong colors
- Machine errors
A clean and correct file helps your machine work better. It also saves time and thread.
What Is an Embroidery File?
An embroidery file is not like a normal image. It is not just a picture. It has stitch data inside it.
What Makes It Different?
- It tells the machine where to stitch
- It sets stitch type and direction
- It stores thread colors
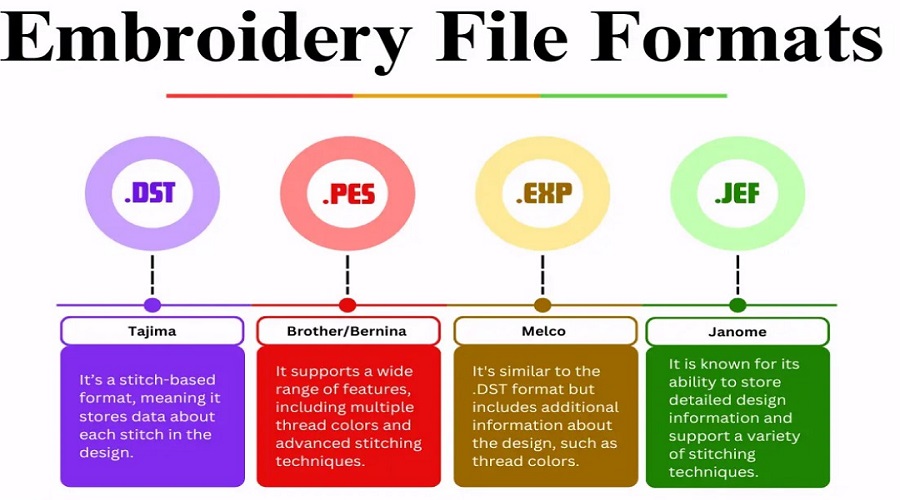
Common File Types
Here are some formats you may see:
- DST
- PES
- JEF
- EXP
- VP3
Each machine uses its own type. Always check your machine manual.
Types of Input Files You Can Use
Before you create an embroidery file, you need a base design.
Raster Images
These include:
- JPG
- PNG
- BMP
They are made of pixels. They can lose quality when resized.
Vector Files
These include:
- SVG
- AI
- EPS
They are better for embroidery. They stay sharp at any size.
Step-by-Step File Preparation Process
Let’s break it down into simple steps.
Step 1: Choose the Right Design
Pick a design that is simple. Too much detail can be hard to stitch.
Tips:
- Use bold shapes
- Avoid tiny text
- Keep lines clear
Step 2: Clean the Image
Before you convert, clean your design.
What to Fix:
- Remove noise
- Smooth rough edges
- Adjust contrast
A clean image gives better results.
Step 3: Resize the Design
Set the right size for your fabric.
Keep in Mind:
- Small designs need fewer details
- Large designs need more stitches
Always match the hoop size of your machine.
Step 4: Convert to Vector (If Needed)
If your file is raster, convert it to vector.
Why This Helps:
- Better control of lines
- Easy editing
- Cleaner stitches
Step 5: Digitizing the Design
This is the most important step.
Digitizing means turning your design into stitch data.
What Happens Here:
- Set stitch types
- Choose stitch paths
- Define stitch density
This step needs skill and care.
Understanding Stitch Types
Different stitches create different effects.
Running Stitch
- Simple and light
- Used for outlines
Satin Stitch
- Smooth and shiny
- Good for letters
Fill Stitch
- Covers large areas
- Adds texture
Choose the right stitch for each part of your design.
Choosing Thread Colors
Colors matter a lot in embroidery.
Tips for Color Selection
- Use fewer colors for simple designs
- Match thread with fabric
- Avoid very close shades
Most software lets you preview colors before stitching.
Setting Stitch Density
Density means how close the stitches are.
Why It Matters
- Too dense → fabric may pucker
- Too loose → gaps in design
Best Practice
Test your design on scrap fabric first.
Pathing: The Hidden Secret
Pathing is the order in which stitches are made.
Good Pathing Helps You:
- Reduce thread breaks
- Save time
- Avoid jumps
Plan the stitch flow from start to end.
Using Embroidery Software
Software makes the process easier.
Popular Features
- Auto digitizing
- Manual stitch control
- Preview mode
Why You Need It
It gives you control over every detail.
Testing Your Design
Never skip testing.
How to Test
- Use scrap fabric
- Check stitch quality
- Look for gaps or overlaps
Testing helps you fix mistakes early.
Common Mistakes to Avoid
Even small errors can ruin your design.
Mistake 1: Too Much Detail
Keep it simple. Small details may not show.
Mistake 2: Wrong File Format
Always use the correct format for your machine.
Mistake 3: Ignoring Fabric Type
Different fabrics behave differently.
Mistake 4: Skipping Test Runs
Testing is a must. It saves time later.
Tips from Real Experience
From hands-on work, here are some useful tips.
Keep Designs Simple
Simple designs stitch better. They also look clean.
Use Quality Thread
Cheap thread can break or fade.
Stabilize Your Fabric
Use the right stabilizer. It keeps the fabric steady.
Practice Often
The more you try, the better you get.
How Fabric Affects Your Design
Fabric plays a big role.
Soft Fabrics
- Need light stitches
- Can stretch easily
Thick Fabrics
- Need strong stitches
- Hold shape better
Always adjust your settings based on fabric.
Tools You May Need
Here are some basic tools.
Essential Tools
- Embroidery machine
- Digitizing software
- Stabilizer
- Threads
- Needles
Having the right tools makes work easier.
How to Build Trust in Your Work
If you sell embroidery, trust is key.
Be Consistent
Make sure every design is clean and neat.
Use Good Materials
Quality matters to customers.
Test Every File
Never send untested files.
Improving Your Skills Over Time
Learning embroidery takes time.
Ways to Improve
- Watch tutorials
- Practice daily
- Try new designs
Each project teaches you something new.
Final Thoughts
Preparing files for embroidery may feel hard at first. But once you learn the steps, it becomes easy. Start with simple designs. Use the right tools. Test your work often.
With time, you will gain skill and confidence. Your designs will look better. Your machine will run smoother. And most of all, you will enjoy the process.
Embroidery is not just a craft. It is a skill that grows with practice. Keep learning, keep testing, and keep creating.